Why the location of a soundproof booth matters just as much as the booth itself
When installing a soundproof booth in an office, people often think first and foremost about the product itself: its level of sound insulation, ventilation, comfort and fittings. And that’s normal. But in real life, a booth can be excellent… and yet still disappoint, simply because it isn’t in the right place.
The question “where should I put it so that it really works?” hides three very practical issues: acoustics (what you hear, what others hear), ventilation (comfort and long-term usability), and usage (will teams actually use it?). In an open-plan office, in offices or in shared workspaces, the immediate environment – foot traffic, glass partitions, noise sources, social areas – can make all the difference to concentration, video calls and phone calls.
In this article, we’ll keep it simple and effective: clear rules, mistakes to avoid, an easy implementation method (plan + test), and specific recommendations to follow to achieve the best result.
The 7 rules that ensure an optimal location in 80% of cases
If you want a quick answer, here it is. These are the rules that, in the vast majority of situations, allow you to place an acoustic booth in the right spot, without making a mistake.
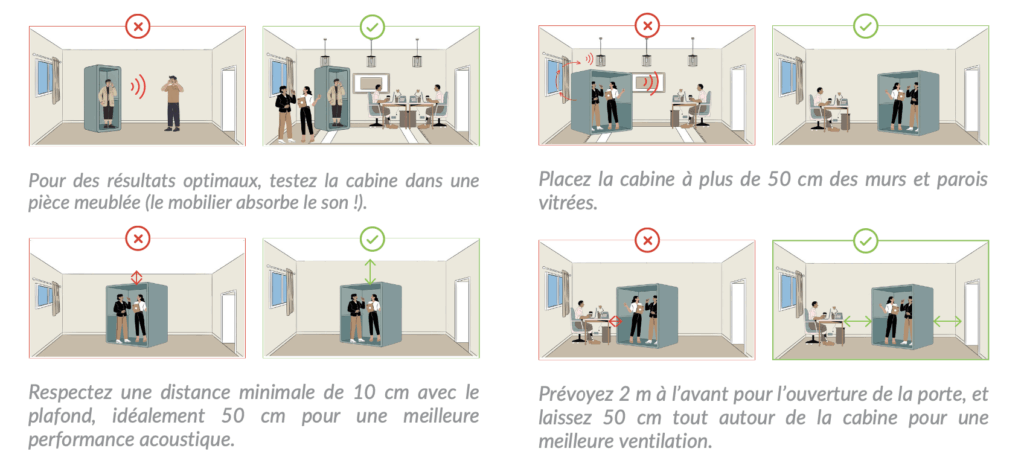
Rule 1: install the booth in a furnished room.
A furnished room is naturally ‘softer’ acoustically: the furniture absorbs some of the reflections and reduces perceived noise. Conversely, an empty or very reverberant room can spoil the experience.
Rule 2: leave at least 50 cm all around for ventilation.
A booth needs to “breathe”. If you place it right up against obstacles, you restrict air circulation. And an uncomfortable booth, even if very well insulated, will eventually be used less.
Rule 3: allow 2 m in front for the door to open.
This is a rule of common sense, but one often overlooked during the planning stage: if access is restricted, getting in and out becomes a hassle, and usage declines.
Rule 4: Position the cabin more than 50 cm from walls and glass panels.
This distance minimises reflection effects and unwanted sound transmission. It also helps avoid a ‘cramped’ installation that detracts from the overall experience.
Rule 5: Leave a minimum of 10 cm clearance below the ceiling, ideally 50 cm.
When it comes to headroom, it’s not just about “fitting in”. It’s also about perceived performance and user experience. Ideally, aim for the recommended space.
Rule 6: place it close to users.
A booth too far from teams quickly becomes underused. The location should encourage “instinctive” use.
Rule 7: avoid areas that encourage people to talk “through the glass”.
If the booth is placed in a spot where people can easily chat in front of it, you lose confidentiality. The aim is for conversations to take place inside the booth, with the door closed — not through the wall.
Define the purpose of the booth: the optimal location depends on its use
You don’t place a booth in the ‘right place’ in an absolute sense. You place it in the right place for its primary use. Phone box, meeting booth, concentration booth: the priorities change.
2.1 Phone boxes and calls: prioritise accessibility and usage flow
For a phone box, the main enemy is not just noise: it is friction in usage. If the booth is too far from workstations, if it is hidden, if it forces people to cross the entire floor… people will do things differently. They’ll take the call at their desk, or they’ll talk outside, and you lose all the expected benefits.
The optimal location, in this case, is one that encourages spontaneous use: close to workstations, close to open-plan areas, and easily accessible. Obviously, ‘close’ does not mean ‘in the constant flow of traffic’: the right balance is a booth that is visible and easy to access, without being placed right in the middle of a busy corridor.
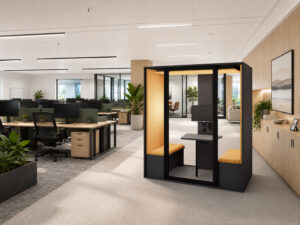
2.2 Meeting booth: prioritise privacy and acoustic stability
A meeting booth is judged on two criteria: can people speak normally without being disturbed, and is the outside environment minimally affected? To achieve this, the location must minimise disturbances: foot traffic, noisy machinery, coffee areas, printers, slamming doors…
Another important point: consistency of use. A meeting cubicle must be in a place where people expect to ‘meet’. Not necessarily isolated, but positioned logically, with sufficient visibility for the team to understand when it is free or occupied.
2.3 ‘Concentration’ cubicle: prioritising perceived calm and avoiding disturbances
Concentration is a subtle matter: what is most tiring is not always continuous noise, but often sudden bursts – a door, someone passing by, laughter, a conversation starting nearby, a printer.
The optimal location must therefore avoid unpredictable disturbances. And one must bear in mind a key fact: for identical booths, the experience varies enormously depending on the environment. A booth placed in a quiet area ‘works’ better, even if the technical specifications are the same.
Essential installation recommendations to follow for optimal performance
Here, the aim is to move from ‘we think that’ to ‘we know what to do’. Quantified recommendations avoid approximations and provide a clear framework.
3.1 Working in a furnished room: the best passive “acoustic treatment”
The starting point is simple: a booth performs better in an environment already “treated” by the real world, i.e. by the furniture. A furnished room limits reflections, reduces reverberation and improves perceived acoustic comfort.
Conversely, an empty or highly reverberant room creates an unfavourable environment: even if the booth does the job, the outside remains harsh, and the overall experience is poorer.
3.2 Respect clearance requirements: ceiling, door, ventilation
This is the basis of a successful installation:
- Ceiling clearance: minimum 10 cm, ideally 50 cm.
- In front of the door: 2 m for opening and use.
- All around: 50 cm for optimal ventilation.
These distances are not mere details: they safeguard comfort, movement and perceived performance. A ‘properly installed’ booth is one you forget about, because it functions naturally.
3.3 Keep away from walls and glass partitions: avoid reflection and transmission effects
The rule is clear: more than 50 cm from walls and glass partitions.
In an open-plan office, glass partitions can cause certain reflections. Walls, meanwhile, can create proximity effects that alter the experience. By maintaining this distance, we limit unpleasant surprises and achieve a more balanced layout: the booth isn’t “crammed in”, it’s integrated.
3.4 Bear in mind that performance is measured “under real-world conditions”
In other words: the environment matters. Performance is designed for real working conditions, not for an empty, silent room.
Direct consequence: in a very noisy environment, the perceived difference can be significant (the booth provides real relief), but there may still be background noise. The aim is not to achieve absolute silence, but a clear improvement in usability and comfort.
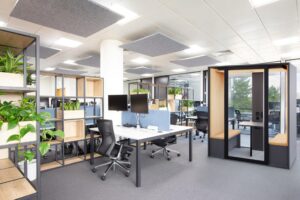
Where to place a booth in an open-plan office: the locations that work best (and why)
4.1 Close to teams, but not in a constant thoroughfare
This is the most important balance: the booth must be close by, otherwise it won’t be used. But it must not be placed in a constant thoroughfare, otherwise the user feels observed, and the outside disturbs the inside.
The right location often resembles an accessible, visible area, but slightly set back: not in the thick of the traffic, not right next to an entrance, not in a corridor where people pass by every thirty seconds.
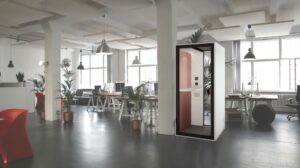
4.2 Use the booth as a “barrier” between noisy areas and work zones
A booth can also play a clever spatial role: serving as a “buffer zone” between a social space (café, entrance, meeting area) and a zone for concentrated work.
The idea is not for the cubicle to become a wall, but for it to contribute to zoning: we channel noisy activities (calls, mini-meetings) to a logical spot, and protect the work areas.
4.3 Making use of underused spaces: corners, back of the floor plan, dead zones
Often, the best locations are not in the centre of the floor plan. These are “dead” zones: a corner, the back of the floor plan, a little-used space. This is an effective way to optimise floor space without obstructing traffic flow.
But be careful: making use of a corner does not mean placing the cubicle right up against the wall. We always follow the rules: at least 50 cm from walls and glass partitions, and 50 cm all around for ventilation.
4.4 Installing multiple booths: group them together or spread them out?
When installing multiple booths, two strategies emerge:
- The “hub”: booths are grouped together in a dedicated area. Advantage: consistency, easy supervision, a “call/meeting hub” approach.
- Distribution: place a booth near each team area. Advantage: immediate adoption, less walking, “instinctive” use.
The deciding factor is simple: usage flow. If everyone has to cross the floor, you lose out on adoption. If, on the other hand, you can create a dedicated area without moving users away, the hub becomes very effective.
What to avoid: locations that impair acoustic performance and the user experience
5.1 Placing the booth against a wall or a bay window: a classic mistake
Failure to maintain more than 50 cm often leads to undesirable effects: reflections, a feeling of confinement, and less efficient ventilation. This isn’t always visible on a floor plan, but it’s very noticeable in use.
5.2 Blocking ventilation or creating an “oven”: reduced comfort and usability
Same rule: 50 cm all around. If you block the air inlets/outlets, you compromise comfort. And a booth where it’s hot, where the air “doesn’t circulate properly”, quickly becomes a booth people avoid.
Where possible, also avoid locations that generate heat: direct sunlight, proximity to a radiator, or equipment that generates heat.
5.3 Placing the cubicle in an overly exposed area: social discomfort and under-use
A cubicle facing a main thoroughfare, or right in front of a meeting room, can create an “aquarium effect”. People feel they are being watched. And above all, this encourages interaction through the glass: someone stops, waves, says a few words… and confidentiality goes out the window.
The idea is simple: choose a location that discourages crowds and naturally encourages people to enter the booth rather than remain outside.
5.4 Placing the booth in a “too empty” room: reverberation and perceived noise
We return to the starting point: the furnished room. An empty room is rarely a good environment. Even if the booth’s insulation is effective, the external atmosphere remains disruptive, and the overall experience suffers in quality.
Soundproof booth and room acoustics: how to treat surrounding noise to improve the result
This section clears up a common misconception: a soundproof booth does not serve the same purpose as acoustic panels or ‘bass traps’. The two approaches can complement each other, but they do not solve the same problem.
6.1 Soundproof booth vs acoustic treatment: sound insulation and absorption do not solve the same problem
The booth aims for localised sound reduction and greater privacy: it creates a protected space for a specific purpose.
Panels and bass traps (acoustic treatment) are used to reduce reverberation and improve the room’s overall acoustics.
In short: the booth addresses the specific use, whilst acoustic treatment addresses the room itself.
6.2 Three simple improvements around the booth (without building work)
Without turning the office into a studio, a few simple steps can improve the result:
- Add absorbent furniture around the booth (if the space is too ‘hard’).
- Use elements that break up reflections: carpets, curtains, bookcases, wall panels if the room is very reverberant.
- Avoid highly reflective parallel surfaces right next to the booth.
The aim is not to “over-treat”, but to make the environment more pleasant and stable.
6.3 When a booth is not enough: signs that the open-plan space needs treatment
There are three simple indicators:
- generally excessive background noise,
- strong room resonance,
- frequent sound spikes (kitchen, printer, doors).
In these cases, the booth provides a benefit, but the open-plan space itself warrants additional treatment.
Ventilation, clearances and technical constraints: the optimal location from a “building” perspective
7.1 Minimum distances to ensure the booth “breathes”
We retain the essential guidelines:
- 50 cm around,
- more than 50 cm from walls and glass partitions,
- 10 cm below the ceiling minimum (and 50 cm ideal).
This is the foundation. Without it, you’re fighting against practicality.
7.2 Allow for usage space: door opening and circulation
The 2 metres in front of the door are non-negotiable if you want a cabin that’s comfortable for everyday use. Add to this general circulation, accessibility, and, if necessary, safety requirements (evacuation).
7.3 Electricity and network: location near a power supply
Finally, the location must allow for a tidy installation: close to a socket and, if needed, a network connection (RJ45). Avoid cables lying about: it’s a matter of comfort, safety and aesthetics.
Step-by-step method: how to identify the best location in your room
8.1 Step 1: mapping noise sources and traffic flows
Before moving furniture, observe. Map out:
- coffee areas,
- printers,
- meeting rooms,
- doors and corridors,
- and all traffic flows: teams, clients, visitors.
The aim is to identify areas where noise is structural, and those where it is sporadic.
8.2 Step 2: test 2 to 3 locations using a floor template
Next, mark out the area. On the floor, mark:
- the footprint of the booth,
- + 50 cm around,
- + 2 m in front.
And check the distances: ceiling, walls, windows. This simple test prevents many errors.
8.3 Step 3: conduct a “real-world” usage test (call + video call + 10 minutes)
The test must be carried out under realistic conditions:
- in a furnished room,
- with the door closed (to activate ventilation and insulation),
- and with actual usage: a call, a video call, and 10 minutes of occupancy.
What we’re measuring isn’t “perfect silence”. It’s the experience: background noise, privacy, ventilation comfort, and whether or not it causes fatigue.
8.4 Step 4: Validate the location with a simple adoption rule
The final rule is almost brutal, but very effective:
Do employees go there spontaneously?
If the answer is no, we don’t blame the booth. We adjust the location: closer to workstations, more visible, better integrated. Sometimes, simple signage or a small change to the layout is enough. Sometimes, it needs to be moved.
Practical examples: the optimal location depending on the room layout
9.1 Rectangular open-plan space: protecting a focus area without isolating the team
In a rectangular open-plan office, a simple strategy works well: position the cubicle as a ‘buffer’ between the entrance/social area and the office area. Avoid placing it right in the centre if it’s a main thoroughfare. And if you want to place it close to the teams, do so whilst ensuring it doesn’t become a crossroads.
9.2 Open-plan space with large windows: maximise natural light and minimise glare
With large glass walls, the rule is clear: at least 50 cm from the windows. Next, choose a location that doesn’t disrupt the flow of light: the booth should blend in without unnecessarily darkening an area.
9.3 Small dedicated room: maximising perceived performance
In a small room, the aim is to make the whole space pleasant:
- furnish the room,
- maintain clearances (ventilation, door, ceiling),
- and avoid obstructing movement around the booth.
This is often a very effective layout, provided it is not ‘overcrowded’.
9.4 Coworking: balancing intensive use and footfall
In a coworking space, the booth must be easily accessible, but never in the middle of a walkway. Zoning is essential: phone calls, meetings and focused work must coexist without getting in each other’s way. A well-placed booth is one that absorbs noisy activities without disrupting the space.
FAQ — Positioning an acoustic booth: frequently asked questions
10.1 Can an acoustic booth be placed right up against a wall?
This is not recommended. We aim for more than 50 cm from walls and glass partitions, and 50 cm all around for ventilation.
10.2 How much space should be left around an acoustic booth?
The simple rule: 50 cm all round, and 2 m in front of the door.
10.3 How much space should be left between the booth and the ceiling?
10 cm minimum, and 50 cm ideally to optimise usage and perceived performance.
10.4 Where should a booth be placed so that teams will use it?
Close to workstations, visible, accessible. A booth that is “too far away” is a booth that gets forgotten.
10.5 How can you prevent people from speaking through the glass?
Remind users of the rules (enter, close the door), and choose a location that minimises crowding: not in a main thoroughfare, not in a spot where people naturally stop to chat.